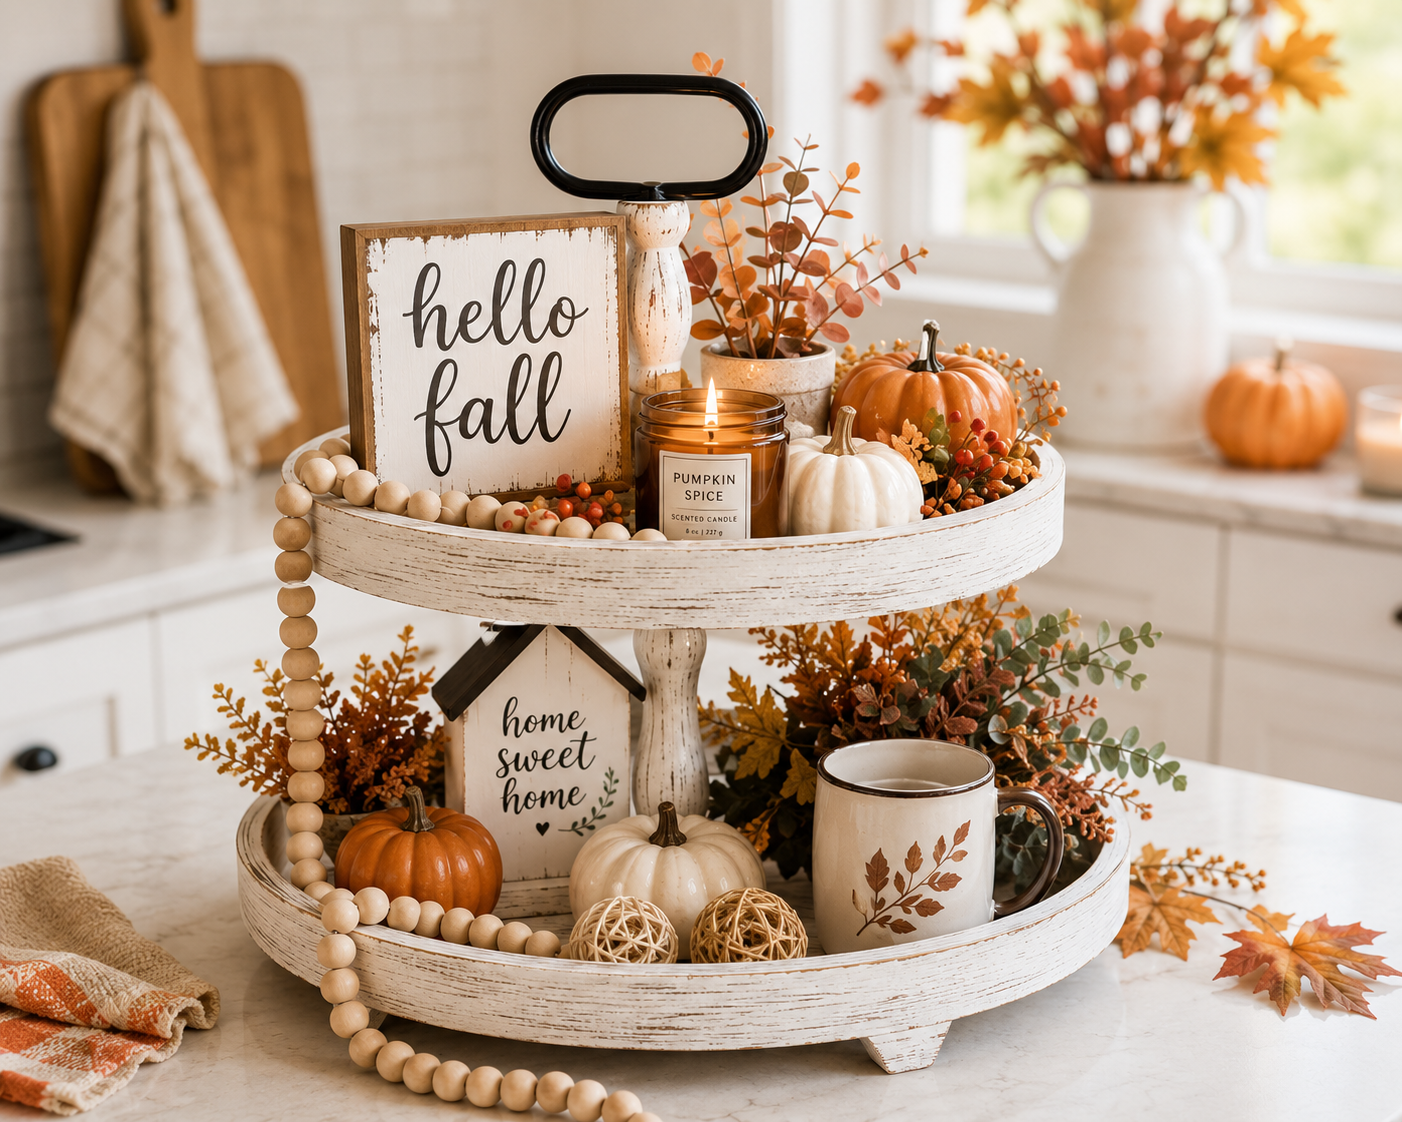
Fall Tiered Tray Decor
If you love the idea of a cozy fall tiered tray but feel overwhelmed by cluttered inspiration photos, this simple formula is for you. In just five minutes, you can style a tray that looks warm, intentional, and pulled together—using only a handful of small, easy-to-store pieces.

Below is the exact formula I used for this tray, plus step-by-step placement instructions, three clutter-proof styling rules, and variations for neutral decor, a small tray, and a coffee bar. Use it as a plug-and-play guide and make it your own.
10 Simple Pieces for a Cozy Fall Tiered Tray
You only need ten small items to get this full, layered look. Most are things you can reuse in other spots when you change seasons.
- Whitewashed 2-tier tray with black handle
- “Hello Fall” mini wood sign (around 4×6)
- Pumpkin spice candle in an amber glass jar
- Mini faux pumpkins — 2 white, 2 orange
- Fall eucalyptus stems with soft orange tips (2 stems)
- Natural wood bead garland (around 38 inches)
- “Home Sweet Home” house-shaped block sign
- Mini faux potted plant (simple greenery)
- Two small wicker or rattan balls
- Fall leaf stoneware mug
Think of these pieces in categories: signs, pumpkins, greenery, fillers, and one useful item (the mug). That mix is what keeps the tray interesting without feeling busy.
Step-by-Step: How to Style Your Fall Tiered Tray in 5 Minutes
Use these quick steps as a roadmap. You can follow them exactly or swap in similar pieces you already own.
Step 1 – Build the top tier base
Place the “Hello Fall” sign toward the back left of the top tier so you can still see it from the front. Set the amber candle near the front left. These two pieces anchor the top tier and give you a tall element (the sign) and a medium-height element (the candle).
Step 2 – Layer in top tier pumpkins
Add one white pumpkin front and center on the top tier. Tuck one larger orange pumpkin slightly behind it and off to one side. Finish with a smaller orange pumpkin tucked to the right. Aim for three different heights so your eye moves around instead of stopping in one flat line.
Step 3 – Add top tier greenery
Tuck one eucalyptus stem behind the pumpkins, letting the leaves spill forward and to the side. If you have any small berry picks, nestle them around the candle and pumpkins to gently fill gaps. The goal is to soften the edges, not to cover every inch of the tray.
Step 4 – Build the bottom tier base
On the bottom tier, place the “Home Sweet Home” house sign toward the back center. Add the mini potted plant to the front left and the fall leaf mug to the front right. This gives you a balanced triangle of height, greenery, and a functional piece you can actually use.
Step 5 – Fill in with pumpkins, rattan, and garland
Nestle the remaining white and orange pumpkins in front of the house sign, slightly overlapping the base of the sign so they feel connected. Tuck the two rattan balls beside the pumpkins to add texture. Drape the wood bead garland from the top tier, over the edge, and down onto the bottom tier. Finally, slide the second eucalyptus stem behind the house sign so a few leaves peek out on each side.
3 Fail-Proof Rules So Your Tray Never Looks Cluttered
- 1. Use odd numbers. Group pumpkins and small accents in threes whenever you can: three pumpkins on the top tier, three on the bottom. Odd numbers feel more natural and less staged.
- 2. Limit it to one sign per tier. More signs mean more words for your eye to read, which makes the tray feel busy. One clear sign on each tier is enough to send the message.
- 3. Let one piece connect both tiers. A single long garland or strand of beads that drapes across both levels instantly ties the whole tray together and looks polished with almost no effort.
Easy Variations to Fit Your Style and Space
All-neutral fall tiered tray
Prefer a softer, neutral look? Swap the orange pumpkins for all white or soft cream pumpkins. Choose eucalyptus in green only and skip the bright berry picks. Keep the wood, wicker, and bead tones natural. You still get all the layers and texture, just in a calmer color palette that works with minimalist or coastal decor.
Small or single-tier tray
If you only have a small or single-tier tray, use the top tier formula and scale it down: one sign, one candle, three pumpkins, a bit of greenery, and a short section of bead garland. You’ll get the same cozy look without crowding the surface or blocking your view.
Fall coffee bar tray
To turn this into a coffee bar moment, move the tray next to your coffee maker. Keep the fall mug on the bottom tier and tuck a spoon or small stack of fall napkins inside it. You can also swap one pumpkin on the bottom tier for a jar of coffee pods, sugar packets, or syrups. You’ll still have the cozy fall feel, but everything earns its spot because it’s useful.
Putting It All Together
The secret to a pretty fall tiered tray isn’t owning a lot of decor; it’s choosing a few hard-working pieces and giving each one a clear job. With one sign per tier, a mix of pumpkins and greenery, and a single garland to connect everything, you can recreate this look in minutes and tweak it for any room or color palette.
If you want to use the exact pieces from the tray in the photo, I’ve rounded them up for you below so you can shop them all in one place.
Shop This Exact Fall Tiered Tray Look
All ten items I used for this tray are saved to my Amazon Idea List so you can quickly recreate the same cozy look or mix and match with decor you already own.
As an Amazon Associate I earn from qualifying purchases.
Leave a Reply